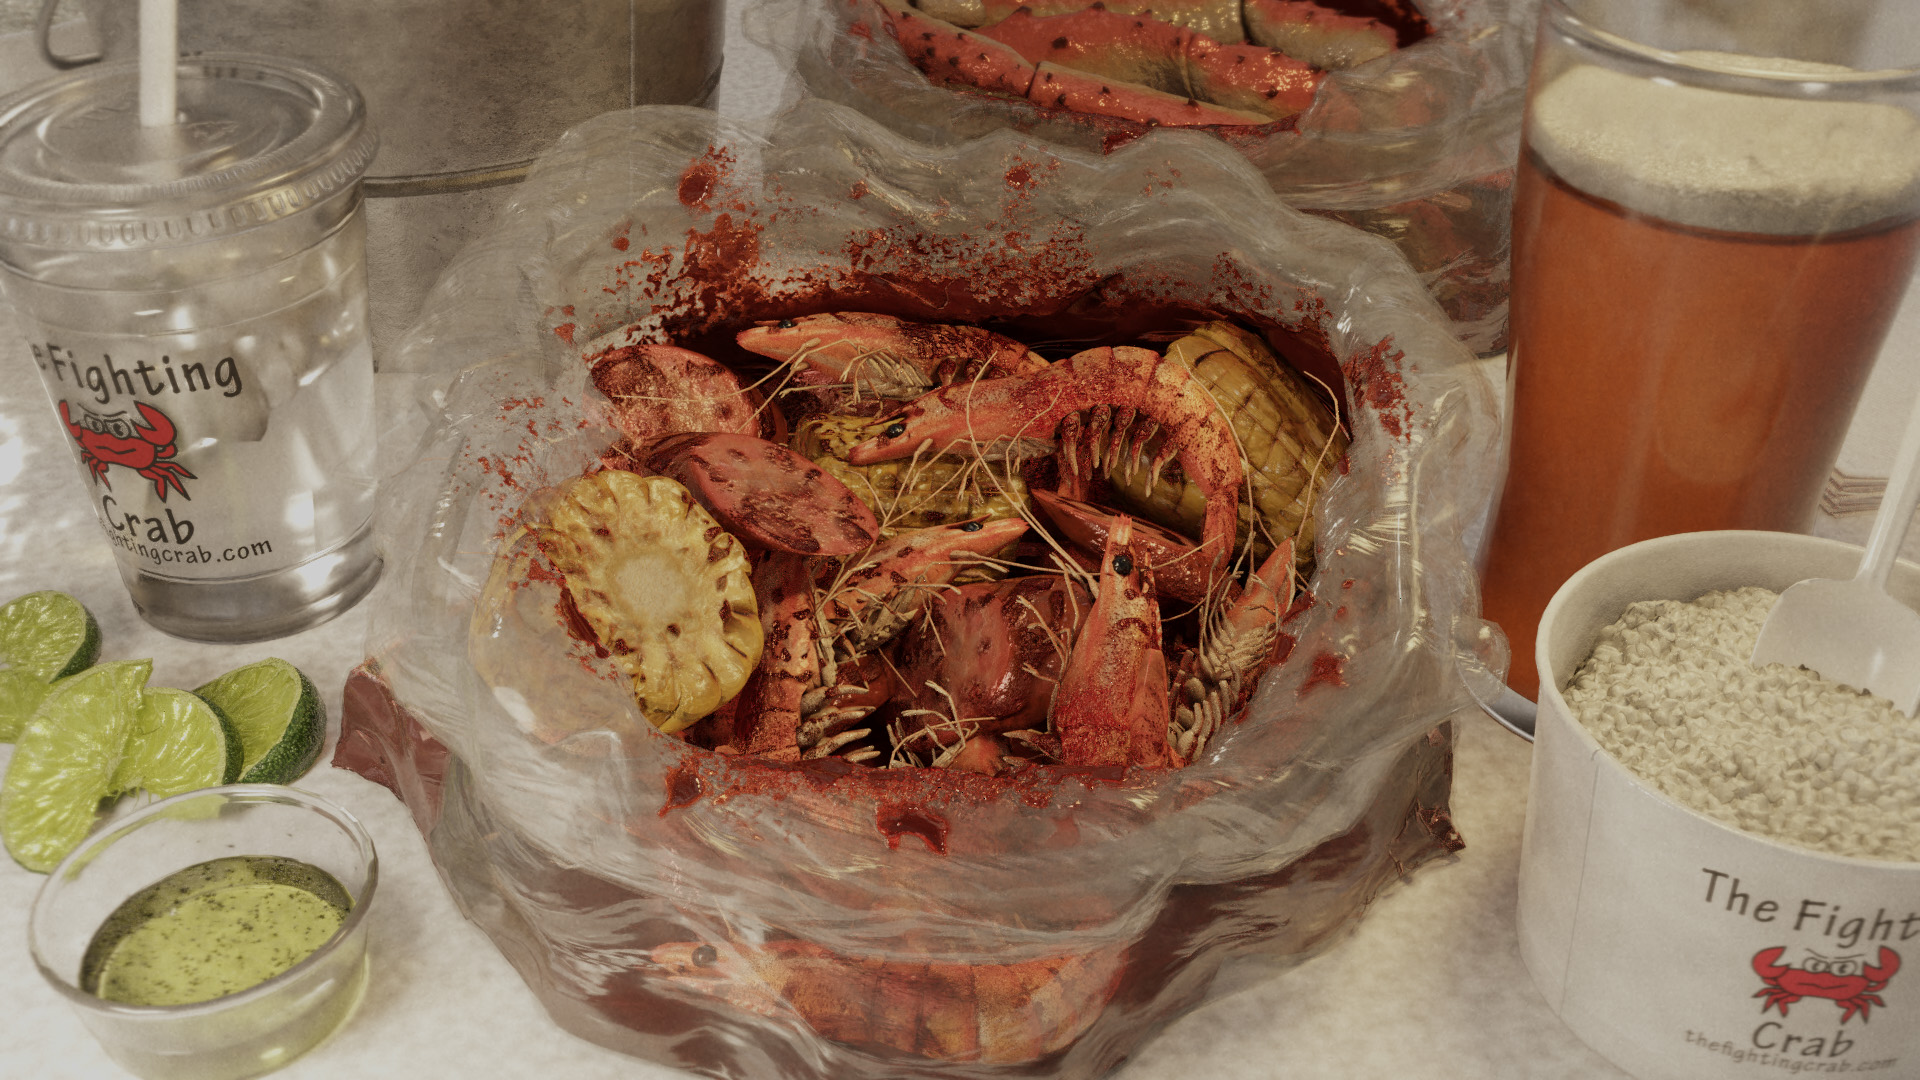
Continuing with my theme of food, after the burger render and the sushi render, I feel proud about what I believe is my best work yet: a Cajun/Creole Sea Food render. To challenge myself, I once again imagined the most difficult thing to render. I settled on one of my favorites dining experiences: a Cajun Seafood Boil, where I get a pound of maximum spicy shrimp boiled in delicious Cajun sauce.
I started to see if my idea was even possible by studying shrimp anatomy and modeling a shrimp. After I successfully modeled a shrimp, with hand-painted textures, I quickly knocked out a corn and sausage model. I made a placeholder plastic bag and dropped several duplicates of the shrimp, corn, and sausage into the bag. The initial renders were a success, so I decided to flesh out the scene with a cup of rice, beer, ice water, waste bucket, crab legs, lime slices, a disposable salt/pepper/lime juice ramekin, and even a subtle pile of napkins.
One of the more convincing details was to get the sauce right. The plastic bag, shrimp, corn, and sausage all have materials with custom “sauce maps” where I hand painted blotches of sauce. The gray scale value of the “sauce-maps” determines the thickness and opacity of the sauce on the surface of the item. They all use the same sauce material via a material node-group in blender, but each material has it’s own surface that is blended into the sauce material with custom sauce-maps.
Eventually I remodeled the plastic bag because my first attempt to was too smooth, and therefore, fake looking. The trick to plastic bags is the “crinkledness” which is hard to replicate and I’m still not entirely happy with my offering here. Much better than my first take, however.
The beer was more-or-less built entirely by watching Andrew Price’s Blender Guru tutorial on modeling a beer, but obvi I used my own scene and lighting.
The plastic ramekin with lime juice, salt and pepper was a breeze, as well as the ice-water cup. But the limes themselves were surprisingly difficult. I made the shrimp model with relative ease, but I spent way more time than I’d like to admit on the limes. Modeling them wasn’t too difficult, but dialing in the material was the real trick. Like the previous renders it required a calculated amount of subsurface scattering as well as a handful of other tricks to get just right. If you saw my earlier renders, the limes were laughably bad. I thought the seafood would be the hard part, but I was not prepared for the diligence required by the limes.
The rice was made by using Blender’s physics simulations to drop a few hundred rice models into a cup, and then baking a normal map and ambient occlusion map to a lower-poly surface. Like the limes, it was surprisingly difficult to get the rice looking sharp, and again I’m not entirely happy. But as a side prop, I think it looks good enough. I did spend several hours iterating on the rice, however.
The crab legs in the background were an afterthought while browsing reference photos from my favorite Cajun restaurants. I hate leaving open space in my renders, especially when it’s just the table surface. I wanted something else, so I imagined that this “photo” was taken while dining with friends, one of whom coke some king crab legs. Modeling, texture-painting and materializing was easy and went by quickly. The bag is duplicated from the main bag but mirrored, rotated, and scaled to mix it up a bit.
Speaking of the table surface, I originally had a normal-mapped wood board surface under the wax paper, similar to the wood boards in my burger render. I intended on having the wax paper be slightly translucent letting some of the table below show through. After research with reference photos, I realized that the wax-paper was more opaque than my memory visualized. Typically, Creole places like these cover the table with wax paper or butcher paper so they can grab the entire mess of shell scraps up in one swoop to clean the table. It was difficult to dial-in the wax-paper at first, but after making it opaque and killing the wood underneath it was quicker to get it looking real.
Interesting to note: this render doesn’t have any image textures from the Internet! That’s right: all the textures were either hand painted, procedural generated, or made in Photoshop / Illustrator. Unlike my previous food renders, this image doesn’t use any surface textures borrowed from Google images. In a previous post I mentioned learning Adobe Illustrator. While I didn’t use Illustrator to fake 3D, I did use it to design the cute “Fighting Crab” Logo seen on the water cup and rice container. I took the vector logo into Photoshop and added some text and a business URL to the texture.
Speaking of the business name, The Fighting Crab, I based this on a common theme for this genre of restaurants. In California my favorite place was “The Boiling Crab,” but there was also “The Kicking Crab.” In NYC “The Boil” is my favorite, but out in Flushing, Queens “The Shacking Crab” is a close second. The naming scheme of “The ____ Crab” seems to be a common thread for Cajun Seafood Boils, so in spirit I named my fictional restaurant “The Fighting Crab” and used Illustrator to design a crab mascot that looks ready to brawl. As an easter-egg, I registered the domain name thefightingcrab.com and made a fake/spoof website as if the restaurant was real ;)!
Otherwise, all the modeling was done in Blender and rendered in Blender’s Cycles engine. I practiced my retopology workflow and tried to keep the poly count low as possible for this render, unlike my previous food scenes. I baked details on the shrimp as well as the rice surface, for instance. My rice could look a lot better if I left the rice particles in-scene, but it would also be close to a million polys. As it stands the render shown is just over 300K polys, but that’s with some extraneous geometry – a duplicate rice container in the top-left background, and a duplicate water cup behind the beer on the top right. Without the polishing duplicates the scene stands just over 200K. I’m proud of my optimization and baking, and I think my future self-challenges will be optimized as well – food or otherwise.
Finally, I had some other tricks up my sleeve to sell the final render. I wanted to keep the final render entirely in Blender. While I did use Photoshop to generate some custom textures, I didn’t want ANY photo-processing done in Photoshop for the final render. My goal was to have this be an entire Blender-workflow for the final image. With one exception I’ll get to. I haven’t touched Blenders compositing nodes in quite a while, so I brushed up and used compositing nodes to add some effects and balance the final color. The idea was to make this image look like it was taken in a real restaurant with a phone camera – not a DSLR fancy pants set up.
To accomplish the look and feel I wanted, I added both a vignette and depth of field blur with compositing nodes, but I kept them super subtle, since a phone camera wouldn’t have good DoF. More interestingly, I added real iPhone camera noise! I took a photo with my iPhone 6 where I deliberately blocked the camera sensor with my finger. I moved around my room until I found a balance where I could take a mostly dark, evenly lit photo, that would include nothing but sensor noise – no real image data. I brought this into Blender as an image compositing node, desaturated it, and mixed it on the adjusted render with modes like Multiply for instance. The result was adding real iPhone 6 camera noise on-top of the sharp rendered image, increasing the sell-ability of the final image. Sure I used my iPhone 6 to capture some noise, but I mixed it in inside Blender’s compositing mode, so the final image still is 100% from Blender.
Now, there is one thing I couldn’t do with Blender (AFAIK), and that was to add JPEG noise. Like I said, I wanted this to look like a camera phone image, and camera phones save their photos in the JPEG format. Blender saves its renders as PNG, as it should, but there’s too much clarity. I opened the final Blender output in Photoshop and deliberately re-saved the image as JPEG with 10/12 quality. This introduced some JPEG artifacts into the image, adding the final layer of believably. I didn’t touch or adjust the render in Photoshop at all – I simply opened the image and immediately resaved it with JPEG compression. Oh yeah, inside Blenders compositing nodes I also warmed up the lighting, and brought it’s value down, since typically a restaurant like this would be lowly-lit (compared to other places), with a warmish light source.
All things said, I feel like this is my best work to date: photoreal, custom painted textures, and a difficult seafood themed challenge. Enjoy!
July 19, 2018 at 9:20 am | 3D Modeling
